Please join me on Facebook
https://www.facebook.com/BarbaraB.Suess
I will no longer be posting to this blog. It's so much easier for me to use Facebook for new photos and patterns and temari inspiration.

Saturday, March 19, 2016
Thursday, January 28, 2016
It's great to be back stitching temari!
 |
| Plum Blossom temari on a C8 by Barbara B. Suess |
It's great to be back stitching temari! This is the first since I had my appendix removed just before Christmas. It took a while to get the energy. Then it took a while to get my concentration back - that surprised me. Doc said that was likely due to the pain and antibiotic meds.
I like to make a new temari from the Japanese books for each JTA lesson even though I've stitched the technique before and could just teach "old" stuff. In Level 2, lesson 11, we will study layered designs on C8s and C10s. I've stitched this plum blossom on a C10 several times. New to me - now I'm making it on a C8, stitching with a double strand of Kyo thread.

Zoe loves licking the treat out of her Kong bone and says "DO NOT DISTURB"!
Good to be back exercising, eating well, and stitching temari - celebrating life!
Saturday, December 19, 2015
42 centers - first ones done!
 |
| "Thank you for sharing your favorite way! I think it might be mine now too!" |
 |
| Well, I tried the new version I give it five out of five needles. I was nice to have a mari at the ready; however, the marking took longer than it should because I had to contend with three cats and a puppy. Hubby helped. I’ll probably just finish it as an overall flax pattern and have an idea how jazz it up a bit. |
I have compiled the directions from this stitch along into one pdf. If you would like a copy to save to your computer, send me an email. Include a photograph of your marked temari along with permission to publish it to my blog here. I'll reply to you with a copy of these directions that you can save to your computer or print and file in your temari notebook. I'd love to see your marked temari and stitched ones as well! Send to BarbSuess@gmail.com
Friday, December 18, 2015
Step 4 - marking 42 centers (the last step!)
Next, check the little triangles. Remember the little triangles? There should still be a pin in the middle of each one. Move that pin around until the lines are crossing through the center. Sometimes, the triangles will look OK; sometimes you'll want to move the pin up or down or sideways just a bit. Just make them the best that you can. Don't fret if some triangles are a little flat or crooked. In the grand scheme of things, you'll hardly see this when you're done. Do this for all the triangles on the ball.

Next, look at the new little hexagons and pentagons. Do the shapes look even? If you have taken care of every little triangle, then the hexagons should look just about perfect. Tack at each pin, removing it from the ball as you go. When you've finished tacking, your marking is complete.


There are 12 small pentagons and 30 small hexagons on this temari with 42 faces. On a 42 faces temari (and all diamond-side based markings), the small pentagons will always line up flat side to flat side. There is one hexagon between the small pentagons. If the small pentagons line up with points facing each other, it is a triangle-side based marking.
 |
| 42 centers marking complete |
So, now the big question: what can you do with it? Well, I might just put it on the shelf and admire it just the way it is! If you want to stitch on it, here are a few suggestions.
 |
| This temari is stitched with interlocking pentagons and hexagons. You can do this same design on 32 centers or 42 centers. |
 |
| The pattern for this 42 centers temari is in my Etsy shop. |
 |
| Continue adding support lines using the multiple of 3 method. |
I have compiled the directions from this stitch along into one pdf. If you would like a copy to save to your computer, send me an email. Include a photograph of your marked temari along with permission to publish it to my blog here. I'll reply to you with a copy of these directions that you can save to your computer or print and file in your temari notebook. I'd love to see your marked temari and stitched ones as well! Send to BarbSuess@gmail.com
I hope you enjoyed this stitch along!
Wednesday, December 16, 2015
Step 3 - mark 42 centers
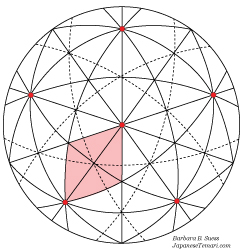
It's time to add the remaining guidelines for this 42 centers marking.
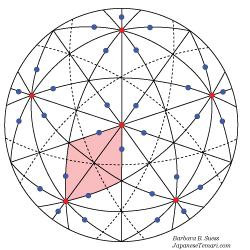


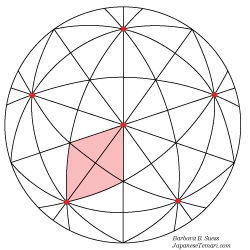
Above is a drawing of the temari with the pins in place. A 4-part diamond is highlighted. Your ball should like this now.
Cut a long length of marking thread. Bring it up at a diamond center as shown in the above drawing.
Note: keep an eye on the threads crossing at the diamond center to make sure they remain in the center of the diamond. Just do this by eye.
Wrap a path around the ball that passes through the pentagons. Lay the thread to the OUTSIDE of the pins (relative to the pentagon center). Notice how the path is curvy, not straight like the wraps through the diamonds. You will end up back where you started.
Pivot to make another wrap - you can place a pin in the diamond center for this purpose. Wrap all the way around the ball passing by the pins as before. When you get back to where you began, you can tack. That intersection is complete and you can tack all threads crossing there and remove the pin.
Continue adding wraps until each diamond center has a 12-way center. As you complete each 12-way center, tack the threads that meet there. These are the centers of the new little hexagons when all marking is complete.
The last step is to adjust the shapes by eye and do the final tacking. I'll posts those directions in a few days.
If you have any questions, please join the conversation on TemariChallenge Yahoo group.
References:
Shapes on a C10 division
Multicenters markings
Schedule of posts for this stitch along:
Step 1 on December 11 - first wraps
Step 2 on December 14 - pin placement
Step 3 on December 16 - last set of wraps
Step 4 on December 18 - adjust and tack. Suggestions for designs.
References:
Shapes on a C10 division
Multicenters markings
Schedule of posts for this stitch along:
Step 1 on December 11 - first wraps
Step 2 on December 14 - pin placement
Step 3 on December 16 - last set of wraps
Step 4 on December 18 - adjust and tack. Suggestions for designs.
Monday, December 14, 2015
Step 2 - marking 42 centers
Taking care of the little triangles (OR placing pins in the sides of the diamonds)
|
| Pins in place for wrapping for 42 centers. |
Remember that I said in my previous post that this 42 centers marking is based on the side of the diamond. Well, it is. You need to place those blue pins (above drawing) in the ball. Yes, sorry, you really do need more pins! Each pin is located at the halfway point along the diamond side. In the past, I would measure the length of that line with my V ruler, divide by 2, and place the pin there. BUT, when I added the thread for the support lines, I noticed that there was always a lot of adjusting to be done. The hexagons that formed were not even on all sides - they were flattened. The pentagons were a bit too large. And it was more that just a pin width so I knew the pin position was not the problem. I realized that I needed to rethink this process and I came up with "taking care of the little triangles." I used to do this after all the measuring by moving the pins. But now I do it as the next step.

Focus on a small triangle. Notice that it has one line through the middle.

2. Place a pin by eye where you judge the center to be. You can always move this pin later so don't worry about it. Just try to get close.
3. When the pin is in place in the center of the little triangle, it looks like this.
4. After you add wraps in the next steps, your little triangle will look like this.
The next step is to add the remaining guidelines. I'll post that in a few days.
If you have any questions, please join the conversation on TemariChallenge Yahoo group.
References:
Shapes on a C10 division
Multicenters markings
Schedule of posts for this stitch along:
Step 1 on December 11 - first wraps
Step 2 on December 14 - pin placement
Step 3 on December 16 - last set of wraps
Step 4 on December 18 - adjust and tack. Suggestions for designs.
Friday, December 11, 2015
Step 1 - marking 42 centers
*** When this stitch along is over, I will offer to send you a pdf of the directions that you can save on your computer or print to file in your temari notebook. Will trade for a photo of your marked ball to publish on my blog. So keep busy! ***
Is your C10 temari marked (the best that you can)? Are the pentagon centers tacked? Then you are ready to begin adding support lines.

Cut a long length of marking thread and bring up at a diamond center. Wrap all the way around the ball in a straight line, passing through the diamond centers. When you get back to where you started, pivot (place a pin there for this purpose) and wrap in the other direction. End off. Don’t tack the diamond center just yet.
Ugh! Do you feel like you have too many pins in the ball? At this point, you have a pin in each triangle center (if you followed my suggestion from the ball prep step) and a pin in each diamond center. When I use the small head pins (size 17), I push them down to the surface of the ball and am not bothered. But if all those pins are giving you fits, then go ahead and tack, removing the pins as you go. When you add more wraps through those spots in the next steps, either stitch under your tacking stitches or wrap over them and tack again. With thin thread like Treasure Braid Petite, you can do either one. Remember that stitching temari is all about choosing YOUR favorite way so you enjoy the process.
Repeat through all diamond centers. You’ll tack the diamond centers after adding more lines in the next steps.
The lines you've just added are dashed lines in the drawing above.
If you have any questions, please join the conversation on TemariChallenge Yahoo group.
References:
Shapes on a C10 division
Multicenters markings
Schedule of posts for this stitch along:
Step 1 on December 11 - first wraps
Step 2 on December 14 - pin placement
Step 3 on December 16 - last set of wraps
Step 4 on December 18 - adjust and tack. Suggestions for designs.
Is your C10 temari marked (the best that you can)? Are the pentagon centers tacked? Then you are ready to begin adding support lines.
Step 1 - add wraps through the diamond centers
Cut a long length of marking thread and bring up at a diamond center. Wrap all the way around the ball in a straight line, passing through the diamond centers. When you get back to where you started, pivot (place a pin there for this purpose) and wrap in the other direction. End off. Don’t tack the diamond center just yet.
Ugh! Do you feel like you have too many pins in the ball? At this point, you have a pin in each triangle center (if you followed my suggestion from the ball prep step) and a pin in each diamond center. When I use the small head pins (size 17), I push them down to the surface of the ball and am not bothered. But if all those pins are giving you fits, then go ahead and tack, removing the pins as you go. When you add more wraps through those spots in the next steps, either stitch under your tacking stitches or wrap over them and tack again. With thin thread like Treasure Braid Petite, you can do either one. Remember that stitching temari is all about choosing YOUR favorite way so you enjoy the process.
Repeat through all diamond centers. You’ll tack the diamond centers after adding more lines in the next steps.
The lines you've just added are dashed lines in the drawing above.
If you have any questions, please join the conversation on TemariChallenge Yahoo group.
References:
Shapes on a C10 division
Multicenters markings
Schedule of posts for this stitch along:
Step 1 on December 11 - first wraps
Step 2 on December 14 - pin placement
Step 3 on December 16 - last set of wraps
Step 4 on December 18 - adjust and tack. Suggestions for designs.
Wednesday, December 9, 2015
Work in progress - from the JTA curriculum
 |
| Temari from the JTA curriculum (Level 4) stitched by Barbara B. Suess Work in Progress |
Another work in progress - I'm continuing to stitch the Level 4 (Master) temari from the JTA curriculum. Level 4 is the top one so I expect these designs to be really challenging.This one has 122 faces. So that's why I marked 42 faces this weekend! When that was complete, I used the multiple of three method to further divide to 122.
Anyway, the white stitching is done (although I now see a few corrections so I'll be ripping and restitching). These are continuous tri-wings that are interlocked at the center. Yes - you really can stitch these continuous paths on 122 centers and it all works perfectly. In other words, I got back to where I began with each path. Combine a lot (!!!) of paths and the tri-wing design is complete.
The next step is puzzling. I'm getting there - almost have it. Send me courage! Patience and persistence also required to figure out these massive designs! Well, not massive, the ball is only 32cm circumference, stitched with 3 strands of floss. Just very intricate.
☆*:.。.o(≧▽≦)o.。.:*☆*:.。.o(≧▽≦)o.。.:*☆*:.。.o(≧▽≦)o.。.:*☆
Level 1 - Beginner
Level 2 - Advanced
Level 3- Instructor
Level 4 - Master
Tuesday, December 8, 2015
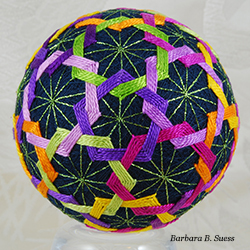
A temari stitch along - right here! Mark 42 centers from a C10 - my favorite way
 |
| A temari stitched with interlocking pentagons and hexagons |
Update Wednesday morning: when this stitch along is over, I will offer to send you a pdf of the directions that you can save on your computer or print. Will trade for a photo of your marked ball to publish on my blog. So keep busy!
Last weekend, I marked a ball with 42 centers and finally took the time to figure out my favorite way. Like most things in the craft of temari, there are several ways to get to the same end point. When I teach classes, I like to point out my favorite way of making temari and also give alternatives. For instance, when wrapping the ball with thread, do you wrap over the top and away from your body or up from the bottom and towards yourself? Either way works!
This method of marking 42 centers requires no measuring. That's right! You'll use your eye, not your tape measure. 42 centers is the first of the multis that is based on the C10 diamond. When all is done, you will have added more guidelines that cut through the sides of the diamonds at their halfway points. Over the next week, I'll be posting the steps for my favorite method. Today is the prep so get ready!
Gather your supplies:
Guideline thread - your favorite thread in a color of your choice. For multicenters markings, I prefer a thinner metallic like Treasure Braid Petite by Rainbow Gallery. #12 pearl cotton is also good if you prefer cotton. If this is your first attempt at marking 42 centers, use one color for the C10 marking and another color for the support lines you'll add. BTW, "support lines" are any lines you add after the original basic marking like the C10.
Pins. In Step 3, you’ll place pins by eye to keep the threads from rolling off the ball. For this task, I recommend using pins with small tops (size 17 Dritz). You can buy them in boxes of 100 or 200 pins. This size is my go-to pin for more advanced designs when I've got a lot of marking to do. You can push them down to the surface of the ball and there is less chance of your thread catching on them.
Step 1 - coming in a few days. See you then!
If you have any questions, please join the conversation on TemariChallenge Yahoo group.
References:
Shapes on a C10 division
Multicenters markings
Schedule of posts for this stitch along:
Step 1 on December 11 - first wraps
Step 2 on December 14 - pin placement
Step 3 on December 16 - last set of wraps
Step 4 on December 18 - adjust and tack. Suggestions for designs.
Sunday, December 6, 2015
Baby's Breath and Roses Temari
I think this temari is just adorable! Kawaii - totemo kawaii! are the words I'd use. Baby's Breath and Roses is from the Japanese temari book Owari Temari: Temari from the Owari Region (Owari Temari) by Ayako Sata. ISBN 4-8377-0391-7. 68 pages. Published in 1991 by Macaw.
In the book, the ball has a black thread wrap and the roses are pink. A nice combination but since the holidays are just around the corner, I couldn't resist stitching in Christmas colors. This is a combination 8 division temari that is a part of the Level 4 (Master) curriculum of the Japan Temari Association.
☆*:.。.o(≧▽≦)o.。.:*☆*:.。.o(≧▽≦)o.。.:*☆*:.。.o(≧▽≦)o.。.:*☆
JTA Levels of Certification
Level 1 - Beginner
Level 2 - Advanced
Level 3- Instructor
Level 4 - Master
In the book, the ball has a black thread wrap and the roses are pink. A nice combination but since the holidays are just around the corner, I couldn't resist stitching in Christmas colors. This is a combination 8 division temari that is a part of the Level 4 (Master) curriculum of the Japan Temari Association.
 |
| Baby's Breath and Roses temari stitched by Barbara B. Suess |
☆*:.。.o(≧▽≦)o.。.:*☆*:.。.o(≧▽≦)o.。.:*☆*:.。.o(≧▽≦)o.。.:*☆
Level 1 - Beginner
Level 2 - Advanced
Level 3- Instructor
Level 4 - Master
Friday, December 4, 2015
Paperwork for JTA certification
Responding to questions about certification through me...
I ask all students and non-students (those who are self-taught in temari) to sign some paperwork that outlines our repective responsibilities in the certification process. This is just so we both know who is supposed to be doing what and when. I waive the teacher fee if you are taking my certification courses online. Questions? Send me an email. I'll be happy to help.

Tuesday, December 1, 2015
Roubai Temari
This is a temari from Fun with Temari (Tanoshii Temari Asobi) by Toshiko Ozaki. "Roubai". Level 4 (Master) from the JTA curriculum. This is a combination 10 division stitched with Vineyard Silk. The challenge here is placing the first row of stitches and stitching all the shapes so they just touch when complete.
JTA Levels of Certification
Level 1 - Beginner
Level 2 - Advanced
Level 3- Instructor
Level 4 - Master
 |
| "Roubai" (Japanese Wintersweet) stitched by Barbara B. Suess |
☆*:.。.o(≧▽≦)o.。.:*☆*:.。.o(≧▽≦)o.。.:*☆*:.。.o(≧▽≦)o.。.:*☆
Level 1 - Beginner
Level 2 - Advanced
Level 3- Instructor
Level 4 - Master
Sunday, November 29, 2015
Important Dates to Remember
Just a quick note today to let you know about upcoming deadlines for JTA certification...
November 30, 2015 - last day to let me know you want to apply for certification in 2016. If it turns out you don't find the time to get this together next spring, no worries. I'd like to know now if you are thinking about it so we can plan a path for you to achieve the results you want.
March 31, 2016 - last day to send me your completed work for Level 1 and/or Level 2.
If you are already in one of my temari courses, you are stitching temari and learning how to write patterns. It's a simple matter to go from there to certification. I will work directly with you and there is no extra charge. You already paid for the course!
If you are self-taught at temari and would like to challenge yourself with certification, I can also help you with that. The process is similar to what I have done in previous years and there will be a fee. I will evaluate your temari (by photos) considering the curriculum introduced by JTA earlier this year. Then I will send you a text that describes in detail the certification process and exactly what you have to do.
Don't be late!
Tuesday, November 24, 2015
Work in progress - I think I finally have the first row stitched correctly. Level 4 (Master) in the JTA Curriculum. Whew!
This is called Glazed Plum, published in the Japanese book Fun with Temari (Tanoshii Temari Asobi) by Toshiko Ozaki.
JTA Levels of Certification
Level 1 - Beginner
Level 2 - Advanced
Level 3- Instructor
Level 4 - Master
This is called Glazed Plum, published in the Japanese book Fun with Temari (Tanoshii Temari Asobi) by Toshiko Ozaki.
 |
| Temari from the JTA curriculum Level 4 (Master) |
☆*:.。.o(≧▽≦)o.。.:*☆*:.。.o(≧▽≦)o.。.:*☆*:.。.o(≧▽≦)o.。.:*☆
Level 1 - Beginner
Level 2 - Advanced
Level 3- Instructor
Level 4 - Master
Sunday, November 22, 2015
Another Chrysanthemum Spray Temari
This is another "Chrysanthemum Spray" from the Japanese temari book Dream Temari - From Classic to Modern (Yume Temari) by Akiko Kanke, Miyoko Shikino, Tatsu Tomita and Sakiko Toyoda. It is part of Level 3 (Shihan) of the temari curriculum of the JTA. I think I'll call this one Spray of Snow!

☆*:.。.o(≧▽≦)o.。.:*☆*:.。.o(≧▽≦)o.。.:*☆*:.。.o(≧▽≦)o.。.:*☆
Level 1 - Beginner
Level 2 - Advanced
Level 3- Instructor
Level 4 - Master
Wednesday, November 11, 2015
Chrysanthemum Spray Temari with another new palette
Finished! This is "Chrysanthemum Spray" from the Japanese temari book Dream Temari - From Classic to Modern (Yume Temari) by Akiko Kanke, Miyoko Shikino, Tatsu Tomita and Sakiko Toyoda. It is part of Level 3 (Shihan) of the temari curriculum of the JTA.
 |
| Temari stitched by Barbara B. Suess |


☆*:.。.o(≧▽≦)o.。.:*☆*:.。.o(≧▽≦)o.。.:*☆*:.。.o(≧▽≦)o.。.:*☆
Level 1 - Beginner
Level 2 - Advanced
Level 3- Instructor
Level 4 - Master
Monday, November 2, 2015
Another palette of threads for temari
Such a serene photo. Soft colors. Dabbled sunlight. I took this picture on our trip to Kyoto in 2011 and have selected this one to develop a new palette of threads for temari. Need help choosing colors? Please visit the Etsy shop!
 |
| Photo by Barbara B. Suess |
 |
| Temple Entrance Palette for Temari |
 |
| 6 colors of pearl #5 and 3 metallics. (Brown pearl not shown) |
 |
| "Serenity" Temari stitched by Barbara B. Suess |
Monday, October 26, 2015
Eight Bridges (Yatsuhashi) done thanks to TemariChallenge!
Yatsuhashi (Eight Bridges) is one of the designs required for Level 3 (Shihan) certification in the Japan Temari Association curriculum. It's a combination 8 division ball that is covered with stitched threads, an all-over design. There are two different continuous paths that are stitched in a layered fashion. You use doubled thread and have the challenge of needing to work some stitches with your needle turned at angle that is a bit different from normal. All these techniques combine to make this a very challenging design!
This design is from the Japanese book Temari from Different Parts of Japan (Zoku Kyodo no Temari) by Chiyoko Ozaki, ISBN 4-8377-0990-7.
I tried it first with #5 pearl cotton thread and was not happy with the result. While not bad, I didn't like the way the threads piled up so high between keeper pins - unruly thread, rolling this way and that! These are the traditional colors with purple representing irises and the red-yellow progression representing the bridges. The story behind this design is truly fascinating! That's one of the things I love about studying temari - I also learn a bit about Japanese culture and history.

This past weekend I headed to my local needlework shop and found this lovely palette of Vineyard silk. Perfect! Now, I feel that I have truly mastered this design.

 |
| Yatsuhashi by Barbara B. Suess |


☆*:.。.o(≧▽≦)o.。.:*☆*:.。.o(≧▽≦)o.。.:*☆*:.。.o(≧▽≦)o.。.:*☆
Level 1 - Beginner
Level 2 - Advanced
Level 3- Instructor
Level 4 - Master
Thursday, October 22, 2015
Adorable kokeshi with temari. Alas! I have too many!
 |
| Kokeshi with temari in the collection of Barbara B. Suess www.etsy.com/shop/JapaneseTemari |
Tuesday, October 20, 2015

Monday, October 19, 2015
Mariana Nelson, an artist with a passion
Last week, my good friend and temari buddy Kathy H. sent me a link to this artist's work. I am amazed! Astounded! Kathy and I are reeling, brain-storming about our own projects that could be inspired by this work.
 |
| Art by Mariana Nelson |
Saturday, October 17, 2015
Six temari sent to JTA
I sent these six temari to the JTA for my Level 4 (Master) certification application.
Top row from left: Double Star, Snowflakes, Mermaids' Tea Party
☆*:.。.o(≧▽≦)o.。.:*☆*:.。.o(≧▽≦)o.。.:*☆*:.。.o(≧▽≦)o.。.:*☆
JTA Levels of Certification
Level 1 - Beginner
Level 2 - Advanced
Level 3- Instructor
Level 4 - Master
Top row from left: Double Star, Snowflakes, Mermaids' Tea Party
Botttom row from left: Grandmother's Garden, Woven Stars, Flower Basket
 |
| Japanese Temari for JTA Level 4 by Barbara B. Suess |
☆*:.。.o(≧▽≦)o.。.:*☆*:.。.o(≧▽≦)o.。.:*☆*:.。.o(≧▽≦)o.。.:*☆
Level 1 - Beginner
Level 2 - Advanced
Level 3- Instructor
Level 4 - Master
Thursday, October 15, 2015
Continuous path stitching is our next lesson
Lesson 8 in JTA course for Level 2.
Continuous line stitching (renzoku) is the technique of stitching several paths around the ball. With each path, you end up back to where you started. Several of these paths combine to complete the design. To demonstrate this technique to students, I designed a new temari with continuous path stitching and a new palette of threads called Lantana. The palette will be available in my Etsy.com shop soon.
 |
| Lesson 8 in Level 2 JTA course is all about continuous line stitching. |
Wednesday, October 14, 2015
Light in your photos
Morning light coming through an east window makes this temari glow!
 |
| "Christmas Puzzle" temari by Barbara B. Suess |
Monday, October 12, 2015
My model is not too sure about this てまり
 |
| Zoe being patient with her mama. |
Sunday, October 11, 2015

Saturday, October 10, 2015

Friday, October 9, 2015
Split the coloring on your kiku herringbone designs for a dramatic result
I've been sorting through my photos and organizing. Can you tell? There are so many that I'd like to revisit so will be posting them here for you to enjoy. Perhaps they will inspire your own temari stitching.
When stitching a kiku herringbone design, you can change colors part way through the row. Either end off and begin again with the new color. Or stitch underground to come up near where you will use the same color again. With this technique, you can use two needles, one for each color.
When stitching a kiku herringbone design, you can change colors part way through the row. Either end off and begin again with the new color. Or stitch underground to come up near where you will use the same color again. With this technique, you can use two needles, one for each color.
 |
| Kiku herringbone stitched with two colors in a temari by Barbara B. Suess |
 |
| Kiku herringbone stitched with two colors in a temari by Barbara B. Suess |
Subscribe to:
Posts (Atom)