 |
| Packing up three of my temari babies for the gallery in Indiana |

Monday, April 25, 2011
Hooray for Fiber Art!

Saturday, April 23, 2011
How to stitch on a thread-wrapped temari
It seems like forever ago that I wrote a bit here about how to make a temari ball.
Spring has arrived here in North Carolina and I thought I'd share how to stitch happy little flowers on a temari. No adding guidelines or anything. Just use your embroidery skills, some pearl cotton, and bring these bright colors into your crafting. The daisies are made by stitching detached chain stitches or lazy daisy stitches grouped together in a little circle. Then you fill the center with yellow French knots. You'll need to use a sewing method rather than a stabbing method since you don't have access to the wrong side of the work like in regular embroidery on fabric. A couple of tips for you ...
 |
| Wrap your temari with blue thread. Stitch happy, sloppy daisies with pearl cotton. |
Wednesday, April 20, 2011
New temari goodies!
Gosh, I am so busy with family life, trips, and getting ready for class that I haven't had any stitching time at all. So sad! But it's like Christmas around here with all the boxes of temari goodies arriving for the Blue Stars Online class.
Just for this class, I ordered a retractable tape measure with a temari design.
I have a few extras that you can find in my shop. You'll also find some of my favorite threads by Rainbow Gallery.
There are 2 kits left (of 72) for the Blue Stars class. Going, going........
Get one before they are gone. I'd love to stitch a combination 10-division temari with you.
Just for this class, I ordered a retractable tape measure with a temari design.
 |
| Tape measure with temari design |
There are 2 kits left (of 72) for the Blue Stars class. Going, going........
Get one before they are gone. I'd love to stitch a combination 10-division temari with you.
 |
| Blue Stars Online Temari Class |
 |
| Extra patterns |
Tuesday, April 12, 2011
Blue Stars Online Temari Class - only 5 kits left
Registration closed Sunday with 67 students - what a wonderful group of stitchers from all over the world. Since thread comes in boxes of 12 skeins, I've ordered enough supplies for 72 kits. So, there is room for 5 more students. If you would like to join, please send me an email. This is your chance to conquer that C10 division!
Class description for Blue Stars
Class description for Blue Stars
Sunday, April 10, 2011
Weddings and a Prom
Not much temari for me right now. We are celebrating a couple of weddings in our family so I'll be traveling. This weekend my daughter attended her senior prom. There is so much to do with her during these last couple of months in high school. Exciting but busy, busy, busy! Here she is - all dressed and ready to join her friends...


Tuesday, April 5, 2011
Part 2 - April Temari Challenge - 20 Faces to Fill
Quick post today. This is a follow up on the challenge 20 faces marking sampler going on in TemariChallenge Yahoo group.
Here are a couple of photographs of the temari I stitched with this marking:
Here are a couple of photographs of the temari I stitched with this marking:
 |
| Variety of herringbone designs stitch on 20-faces temari |
Friday, April 1, 2011
April TemariChallenge - 20 Faces to Fill
Marking a combination division temari is often daunting to beginners. But after stitching a simple division temari, with one design on the north pole and one design on the south pole, the next challenge is to mark a temari that has more than two faces. There is an easy way to skip ahead to marking multiple faces on the ball without going the route to the combination divisions.
There are many ways to add support lines to further divide the ball. I'm leading the April challenge in our TemariChallenge Yahoo group to share how to turn a simple 12-division into a temari with 20 faces.
I hope you can join us!
 |
| 20 Faces Special Marking Temari |
I hope you can join us!
Wednesday, March 30, 2011
March Temari Challenge
I've talked about TemariChallenge Yahoo group often. Have you joined yet? I sure hope so. Joan led us through a pattern that she figured out from one of the temari books published in Japan. I just finished putting the final touches on mine....
 |
| March Challenge Temari |
Friday, March 25, 2011
Remembering Jerry Kreinik
Sad news from Kreinik thread company. Jerry Kreinik passed away March 23. You can read the obituary by clicking on this link. A good soul has passed.
You can see I'm a fan! The company has always been very generous to me as a designer and author. I'm sure that's part of Jerry's doing.
 |
| Stash of Kreinik thread for temari |
Thursday, March 24, 2011
Blue Stars Online Temari Class - learn a combination 10-division
 |
| Blue Stars Online Temari Class |
 |
| Extra patterns that come with the class |
Monday, March 21, 2011
Spring Sakura Showers
On this first full day of spring I was caught in the middle of a shower while on my morning walk. Not a drop of rain. Thousands of cherry blossom petals swirled around me like a blizzard! Every year this happens and every year I think back to the days in Yokohama when I took our young daughter to the park to get her shower of petals. I want to run and twirl and reach up to the sky like she did!
 |
| "I'm going to take off running. Can you catch me?" |
Thursday, March 17, 2011
It's winter in northern Japan
 |
| Japanese temari from my book |
Did you see the snow falling on the rescuers digging through the earthquake and tsunami rubble in northern Japan? It's cold there now. Yesterday I got an email from Luana Rubin at equilter.com about sending quilts to Japan. She is partnering with Mission of Love to ship supplies to the victims of this horrible disaster. I think this is a wonderful way to reach out personally to help. Luana is working on the logistics and I'll be posting about it as soon as she lets us know. I have an idea for a quilt to give.
Wednesday, March 16, 2011
I love this marking!
Back to the Flower Temari Challenge for a bit....
Someone in our TemariChallenge Yahoo group asked about marking the 10-part pentagon on a combination 10-division so you end up with a small pentagon in the center surrounded by small pentagons.
 Thanks to NanaAkua who photographed her grandmother's temari and put them in a Flickr album, we can see an example of this. Of course, we are enjoying the beauty of all her temari but they are also a great source for study on how to make them. NanaAkua photographed one of her grandmother's temari that is marked like this.
Someone in our TemariChallenge Yahoo group asked about marking the 10-part pentagon on a combination 10-division so you end up with a small pentagon in the center surrounded by small pentagons.

Sunday, March 13, 2011

Wednesday, March 9, 2011
Japanese Family Crests and Designing for Temari
Want to add meaning to your temari designs? Need inspiration on arrangement of stitched motifs? The Elements of Japanese Design, A Handbook of Family Crests, Heraldry & Symbolism by John Dower has been one of my best sources. And we all know every artist needs her sources, right?
"The Elements of Japanese Design is a library of traditional Japanese design motifs in the form of more than 2,700 family crests (mon) compiled and drawn by a Kyoto publisher and bookseller early in the twentieth century, and selected and interpreted by John Dower, a leading American scholar of Japan.
"The Elements of Japanese Design is a library of traditional Japanese design motifs in the form of more than 2,700 family crests (mon) compiled and drawn by a Kyoto publisher and bookseller early in the twentieth century, and selected and interpreted by John Dower, a leading American scholar of Japan.
Monday, March 7, 2011
New Temari Class Begins on Tuesday

Echo Star Temari Class
I’m excited to be introducing so many people to this ancient needle art. We are beginning the class with almost 80 students! We are from:
Alabama, Australia (New South Wales), California, Canada (Alberta), Canada (British Columbia), Canada (Ontario), Colorado, Connecticut, Florida, Germany, Illinois, Iowa, Maine, Maryland, Minnesota, Missouri, Nebraska, Nevada, New Jersey, New York, North Carolina, Ohio, Oklahoma, Oregon, Pennsylvania, Saudi Arabia (Jeddah), South Carolina, Tennessee, Texas, United Kingdom (Surrey), Vermont, Virginia, Washington, and Wisconsin. WOW!
Thursday, March 3, 2011
Hinamatsuri in Japan (Doll Festival or Girls' Day) March 3
 |
| Miniature Emperor and Empress |
Wednesday, March 2, 2011
Split Kiku (2 colors, 4 needles)
In a diversion from the flower temari challenge, I'd like to share a new temari with the kiku (chrysanthemum) design stitched in 2 colors. I guess I needed a break from all those flowers!
If you need any help with temari terminology, please have a look at my website glossary and stitch directory.
If you need any help with temari terminology, please have a look at my website glossary and stitch directory.
 |
| Kiku design temari stitched with two colors. |
Friday, February 25, 2011
Rosemary has "a penchant for puzzles"
Isn't this temari lovely?! Rosemary, a member of our TemariChallenge Yahoo group, shared a photo of the temari that she completed for our flower challenge.


Rosemary stitched this C10 division with silk ribbon. She said, "I have just uploaded 2 photos to the flower sampler folder. One is a closeup of the roses. I chose roses for October because that is the month of the Rose Festival in East Texas--probably not a month for roses in other parts of the country, but here they are splendid then. The other photo shows the camellia for January (at the top), pansy for March, and Iris for April.
The 36 cm mari was wrapped in RAINBOWS SUPERIOR #849 (sand castle) thread and marked with eighth inch bamboo caning strips. All flowers are done in silk ribbon embroidery, but what I'm most proud of, is the marking with bamboo.
As I mentioned before, the challenge was both frustrating and exciting. I just loved doing it. I did a lot of sailing down the RIO ADIR! (that's my acronym for Rip It Out And Do It Right.) but overall I'm very pleased."
Rosemary's temari is truly a work of art. Attaching strips of real bamboo to the the ball as borders and stitching with silk ribbon are both very unique and creative accomplishments.
This Texas gal has been stitching temari for only a few years. Last year, she passed both Level 1 and Level 2 certification for the Japanese Temari Association. For Level 2, she demonstrated her ability to stitch temari and to write patterns using correct terminology by submitting patterns for six different temari. With this original design for the flower temari challenge, she is well on the way toward Level 3 which requires eight original patterns. Way to go, Rosemary!
Thanks for being a part of TemariChallenge, Rosemary. You are an inspiration to us all and I'm happy to have found you as a kindred sister.
.....


Rosemary stitched this C10 division with silk ribbon. She said, "I have just uploaded 2 photos to the flower sampler folder. One is a closeup of the roses. I chose roses for October because that is the month of the Rose Festival in East Texas--probably not a month for roses in other parts of the country, but here they are splendid then. The other photo shows the camellia for January (at the top), pansy for March, and Iris for April.
The 36 cm mari was wrapped in RAINBOWS SUPERIOR #849 (sand castle) thread and marked with eighth inch bamboo caning strips. All flowers are done in silk ribbon embroidery, but what I'm most proud of, is the marking with bamboo.
As I mentioned before, the challenge was both frustrating and exciting. I just loved doing it. I did a lot of sailing down the RIO ADIR! (that's my acronym for Rip It Out And Do It Right.) but overall I'm very pleased."
This Texas gal has been stitching temari for only a few years. Last year, she passed both Level 1 and Level 2 certification for the Japanese Temari Association. For Level 2, she demonstrated her ability to stitch temari and to write patterns using correct terminology by submitting patterns for six different temari. With this original design for the flower temari challenge, she is well on the way toward Level 3 which requires eight original patterns. Way to go, Rosemary!
 |
| Rosemary photographed by the Mineola Monitor |
Thanks for being a part of TemariChallenge, Rosemary. You are an inspiration to us all and I'm happy to have found you as a kindred sister.
.....
Kindred (adjective): having the same belief, attitude, or feeling.
Sister (noun): a female friend regarded as a sister.
.....
Tuesday, February 22, 2011
Poinsettia - Flower Temari Challenge
Here's another face done for our temari challenge. This one started with the name red daisy but I switched it to poinsettia whenI discovered that I don't really need any more summer flowers for this temari. I do need one for December, though. We are stitching on a combination 10-division temari that has twelve faces (pentagons) to be filled with flowers. The goal is to select one for each month of the year.
First post on Flower Temari Challenge gives info on making and marking the ball.


2. Mark the spots for the stitches taken for the top of each kite shape (the points closest to the center). Measure out from the center 1.5cm and place a pin on each of the ten division lines. Actually, I like to print out a circle guide for this step and just pin it to the center.
3. Mark the spots for the stitches taken for the bottom of each kite shape (those towards the outside of the shape). Place pins 1.5cm from the outer edge (the triwing stitching).
4. With #078 Pearl, stitch 1 row on each kite - layer the sides of the kites over each other as you work your way around the ball until all 10 kites have one row done.
5. Continue adding rows to each kite, one at a time to make a layered design. Add a total of 5 rows #084 African Sunset on each kite or until the edges touch.
6. With #209 Iris, stitch a herringbone around the outside edge of the kites. Then add spokes across the center, one for each division line. Stitch a spiderweb backstitch around the center.
I've got to get busy stitching more flowers - only a few more to go! Are you a member of TemariChallenge Yahoo group? If not, please join us. Other members are adding their flowers and the folder of flower photos is beginning to bulge!
First post on Flower Temari Challenge gives info on making and marking the ball.

This one is probably hard to figure out without seeing the diagram. Do you see the kite shapes? I've colored one red and one blue. Since this is a 10 division, there are 10 kite shapes layered around the center intersection. I added 1 row on each at a time until the spaces between them were filled. All threads are Caron Watercolors.

1. Stitch support lines: place a pin 2cm out from the center on each of the 10 division lines. Stitch at the pins making a 10-sided shape (dashed line in the diagram). You will use these support lines when stitching the sides of the kite shapes.
I've got to get busy stitching more flowers - only a few more to go! Are you a member of TemariChallenge Yahoo group? If not, please join us. Other members are adding their flowers and the folder of flower photos is beginning to bulge!
I woke up today to news of the horrible earthquake in Christchurch, New Zealand, and my heart is so sad - I could not watch without tears coming to my eyes. Our family spent two wonderful, amazing weeks traveling around this beautiful country. There's no place like it on earth. Let's keep them in our prayers and offer any support we can.
Thursday, February 17, 2011
Hydrangea - Flower Temari Challenge
Fluffy poofs of lavender, purple, blue, and pink hydrangeas are my daughter's favorite flowers and are at the top of my list for the Flower Temari Challenge.
The first post on Flower Temari Challenge gives info on making and marking the ball.
Lovely shades of variegated Caron Watercolors thread makes this flower fun to transfer to a stylized design on a temari. Once again, I've irreverently disregarded the shape of the 10-part pentagon. Since I wanted to represent each petal with a small square, I stitched a grid with copper colored metallic thread, laying the lines 1cm apart and at right angles. Here's the diagram:
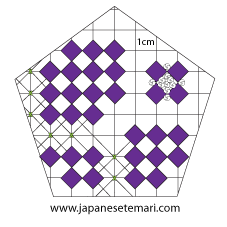

Then add more grid lines, this time on the diagonals. You can stitch under the flowers. Secure each intersection of grid lines with a small cross stitch (#271 Wasabi). I guess you could add these diagonal lines and the cross stitches before stitching the flowers.

 |
| Hydrangea |
Lovely shades of variegated Caron Watercolors thread makes this flower fun to transfer to a stylized design on a temari. Once again, I've irreverently disregarded the shape of the 10-part pentagon. Since I wanted to represent each petal with a small square, I stitched a grid with copper colored metallic thread, laying the lines 1cm apart and at right angles. Here's the diagram:
After stitching the grid lines, I placed groups of pins where I would stitch the squares to form each flower head. Threads used for the squares (all are Caron Watercolors): #232 African Violet and #267 Wisteria.
With #124 Sunglow, stitch French knots in between the squares and a few around the edge of each flower head.

Then add more grid lines, this time on the diagonals. You can stitch under the flowers. Secure each intersection of grid lines with a small cross stitch (#271 Wasabi). I guess you could add these diagonal lines and the cross stitches before stitching the flowers.

I love the way the French knots raise the stitched design so it looks and feels very textural. The grid in the background offers a contrast with its fine, almost elegant look. I just wish my camera could capture that feel.
Monday, February 14, 2011
Kaga Temari Experience (a kindred sister)
Well, I didn't intend to write about other blogs or websites when I started this blog, but I just have to share another interesting webpage that just popped up on my Google alert for temari.
Kaga Temari Experience (click here)
The author visited Kaga Temari Master Takako Koide in the shop where she teaches in Japan.
There's a little bit about temari history and how they make them. I always love studying the pictures to see if I can puzzle out the pattern.
Another kindred sister!
Kaga Temari Experience (click here)
The author visited Kaga Temari Master Takako Koide in the shop where she teaches in Japan.
 |
| Kaga Temari Master Takako Koide |
Another kindred sister!
.....
Kindred (adjective): having the same belief, attitude, or feeling.
Sister (noun): a female friend regarded as a sister.
.....
Saturday, February 12, 2011
Inspired to Blog by Boggon (a kindred sister)
Craft Month: Why Should Crafters and Artists Blog by Sharon Boggon
or
How blogs and social media can help crafters
Sharon b is an inspiration to many of us who use the internet as a learning, teaching, and sharing tool. Every day (almost!) she writes about a project or event of interest to anyone who likes to make things by hand - including embroidery, crazy quilting, and even computer art. On a regular basis, I am inspired by her blog and her online directory of stitches as sources to improve my own work with Japanese temari. Now, she has helped me understand why I started a blog and how it can also help improve my work. Thanks to my kindred sister, Sharon!
.....
Be sure to follow her blog Pin Tangle

or
How blogs and social media can help crafters
Sharon b is an inspiration to many of us who use the internet as a learning, teaching, and sharing tool. Every day (almost!) she writes about a project or event of interest to anyone who likes to make things by hand - including embroidery, crazy quilting, and even computer art. On a regular basis, I am inspired by her blog and her online directory of stitches as sources to improve my own work with Japanese temari. Now, she has helped me understand why I started a blog and how it can also help improve my work. Thanks to my kindred sister, Sharon!
.....
Kindred (adjective): having the same belief, attitude, or feeling.
Sister (noun): a female friend regarded as a sister.
.....
Be sure to follow her blog Pin Tangle
 |
| Follow Sharon at Pin Tangle |
Friday, February 11, 2011
Lantana - Flower Temari Challenge
 |
| Lantana |

The first post on Flower Temari Challenge gives info on making and marking the ball.
1. Add support lines in fine metallic green thread. Divide each pentagon short line into 3 sections. Stitch concentric pentagons and then add the remaining support lines like a 122 centers marking.


Happy stitching!
Thursday, February 10, 2011
It's a small world (how far is it from China to Raleigh?)
New video from Komusume-Rita. Looks like she was on TV.
I "met" Rita on Facebook in a very roundabout way - an Around-the-World amazing way, through our computers. I have a Google alert set for "temari" so every now and again, I get an email with links to websites and blogs that include the word. Most of them are about the Japanese cartoon character Temari, not the thread-wrapped and embroidered handballs that I love so much. A few months ago, an alert came in to a blog written by an American (I think) living or travelling in China. She posted photos and wrote about Rita, who was showing her temari at a craft show. Not selling them; she was just there to display them. The blog author had a link to Rita's Facebook page so I raced over there to see her lovely creations. Of course, it was just a click or two away and I didn't have to go all the way to China. Too bad, really - I might be up for that!
Lo and behold - look what I found among her temari photos:
Rita travels to Japan where she studies temari. She had purchased the latest book from the Japan Temari Association that includes one of my patterns. I love her choice of colors and her display is simply elegant.
I "met" Rita on Facebook in a very roundabout way - an Around-the-World amazing way, through our computers. I have a Google alert set for "temari" so every now and again, I get an email with links to websites and blogs that include the word. Most of them are about the Japanese cartoon character Temari, not the thread-wrapped and embroidered handballs that I love so much. A few months ago, an alert came in to a blog written by an American (I think) living or travelling in China. She posted photos and wrote about Rita, who was showing her temari at a craft show. Not selling them; she was just there to display them. The blog author had a link to Rita's Facebook page so I raced over there to see her lovely creations. Of course, it was just a click or two away and I didn't have to go all the way to China. Too bad, really - I might be up for that!
Lo and behold - look what I found among her temari photos:
 |
| Kiku and Fans by Komusume-Rita |
 |
| Kiku and Fans by Barbara Suess JTA Level 3 Design |
 |
| Kiku and Fans by Barbara Suess JTA Level 3 Design |
Here's the cover of the book
 Color Coordinated Temari: Seasonal Events (Irodori no Temari - Saijiki) by Toshiko Ozaki |
Rita has other videos on YouTube. Search her name KomusumeRita and you'll find some interesting clips of her macramé, beading, and other crafts - so cute!
Thanks for sharing your love of temari on the internet, Rita! Xie xie! I can't wait to see more from my kindred sister in China.
'Thank you' in Chinese is 谢谢 or xie xie in pinyin (pronounced 'sheh sheh').
.....
Kindred (adjective): having the same belief, attitude, or feeling.
Sister (noun): a female friend regarded as a sister.
.....
Monday, February 7, 2011
Sanuki Temari (a kindred sister a world away)
 |
| Some members of Sanuki Kagari Temari Hozonkai Eiko Araki is sitting on the right. |
Eureka! I've stumbled upon a couple of new blog posts about temari from Japan. The blog author (David) visited Eiko Araki and her group of temari makers.
In the first post, David relates the history of Sanuki temari shared by Araki-san.
"How to make Sanuki temari" is the subject of his second post.
He filmed a video of the ladies working
Thanks, David!
Saturday, February 5, 2011
Kyoto Bound (and Tokyo, too)
 |
| Golden Pavilion in Kyoto (Kinkakuji) |
Click on this link to get the scoop on our trip.
In the late 1980's, my husband, baby girl, and I moved to Yokohama for four years. Needless to say, after so much time passing, I don't remember much of the "survival" Japanese that I learned to speak while we lived there. I do recall some of the most important expressions like where's the bathroom, where's the train station, and I'm so sorry. Most often the replies to my broken Japanese queries came in lovely, well-spoken English. I also remember how to hail a cab and show the driver a piece of paper with my destination written out. Works wonders for a lost traveler to make her way back home to the hotel.
Glenna and I will begin our trip by traveling to Seattle. We'll meet up with Kathy who lives nearby and all fly to Kyoto together. After 10 days in Kyoto, we'll take the bullet train to Tokyo where we will stay for a couple of days before flying back to Seattle together.
Plans for our day-to-day activities are coming together nicely. I'll post those another time. Now, I've got to hurry to yoga class so I can be flexible enough to sit on the floor!
TTFN!
Barb
Friday, February 4, 2011
Chrysanthemum - Flower Temari Challenge
A traditional temari kiku (chrysanthemum) design fills this pentagon on the Flower Temari Challenge ball. The kiku herringbone stitch is used in a layered fashion with the stitches packed closely together to cover much of the thread-wrapped surface.
First post on Flower Temari Challenge gives info on making and marking the ball.
Begin by using a thin metallic thread to divide the pentagon into twenty sections. Place the stitches for the inside points very close to the center intersection. For the outside points, place stitches for the first row 1.5cm from the outside border (the triwing stitching).
Using Caron Watercolors # 057 Buttercup, stitch a layered kiku herringbone design, adding enough rows so you almost reach the triwing stitching. Leave enough room for two more rows. Stitch these with #206 Guacamole. (Don't you just love the names of the thread colors?!)

Fill the center with French knots using #057 Buttercup. Use one strand of thread in the needle and wrap three times for each knot.
Add a bit of sparkling green metallic between the kiku sections in the centers.
Finished!

First post on Flower Temari Challenge gives info on making and marking the ball.
Begin by using a thin metallic thread to divide the pentagon into twenty sections. Place the stitches for the inside points very close to the center intersection. For the outside points, place stitches for the first row 1.5cm from the outside border (the triwing stitching).
Using Caron Watercolors # 057 Buttercup, stitch a layered kiku herringbone design, adding enough rows so you almost reach the triwing stitching. Leave enough room for two more rows. Stitch these with #206 Guacamole. (Don't you just love the names of the thread colors?!)
Fill the center with French knots using #057 Buttercup. Use one strand of thread in the needle and wrap three times for each knot.
Add a bit of sparkling green metallic between the kiku sections in the centers.
Finished!

Thursday, February 3, 2011
Forget-me-nots - Flower Temari Challenge
In my last post Weaving Designs for Fill, I wrote about a hexagonal weave (mutsume ami). That's the one I used to fill a pentagon and create a grid for stitching little forget-me-not flowers. I always type forget-me-KNOT and then have to go back and correct! I guess that comes from writing so many patterns :)
First post on Flower Temari Challenge gives info on making and marking the ball.
How to fit a hexagon-shaped woven pattern into a pentagon? Very carefully! Start by stitching a line with thin metallic thread like the blue line in this diagram - from the point of the pentagon to the middle of the opposite side. Add parallel lines that are equidistant. I spaced them 0.5cm apart. To align the remaining threads crossing through the pentagon, it really helps to use a paper template shaped like a hexagon (pink hexagon in the drawing below). Pin the paper hexagon to the ball and use the sides to align the first line in each direction.

All design threads are Caron Watercolors.
Stitch the flowers with #234 Celestial Blue. Bring thread up a 1 and make a long underground stitch from 2 to 3. Try not to disturb the grid lines by pulling them out of place with the underground stitch. Between stitches, always lay your thread above the needle (towards the outside of the design) so your stitches will all be the same and a neat circle is formed.

Continue stitching a hexagon shape by going down at 4, up at 5, etc.

With the same thread, stitch another row. This time make short underground stitches. Both rows will close in towards the center.

To fill in the center of the flower, use # 275 Daffodil. Use doubled thread and make a small straight stitch through the center. Leave it a little loose but neat.
Stitch more flowers over the grid leaving a few empty spaces which you can fill with pine needle stitches ( #271 Wasabi).
All done!
First post on Flower Temari Challenge gives info on making and marking the ball.
How to fit a hexagon-shaped woven pattern into a pentagon? Very carefully! Start by stitching a line with thin metallic thread like the blue line in this diagram - from the point of the pentagon to the middle of the opposite side. Add parallel lines that are equidistant. I spaced them 0.5cm apart. To align the remaining threads crossing through the pentagon, it really helps to use a paper template shaped like a hexagon (pink hexagon in the drawing below). Pin the paper hexagon to the ball and use the sides to align the first line in each direction.
All design threads are Caron Watercolors.
Stitch the flowers with #234 Celestial Blue. Bring thread up a 1 and make a long underground stitch from 2 to 3. Try not to disturb the grid lines by pulling them out of place with the underground stitch. Between stitches, always lay your thread above the needle (towards the outside of the design) so your stitches will all be the same and a neat circle is formed.
Continue stitching a hexagon shape by going down at 4, up at 5, etc.
With the same thread, stitch another row. This time make short underground stitches. Both rows will close in towards the center.
To fill in the center of the flower, use # 275 Daffodil. Use doubled thread and make a small straight stitch through the center. Leave it a little loose but neat.
Stitch more flowers over the grid leaving a few empty spaces which you can fill with pine needle stitches ( #271 Wasabi).
All done!


Subscribe to:
Posts (Atom)