Showing posts with label temari stitches. Show all posts

Tuesday, July 24, 2012

Flax leaf - studying the books

Still on the flax leaf kick, I've been pouring through my collection of Japanese temari books and finding some amazing designs that include asanoha, flax or hemp leaf design. No wonder. It's a very old an important product.

From The Ultimate Sashiko Sourcebook by Susan Briscoe:
"Star-like asanoha (hemp leaf) is probably the most famous sashiko pattern. It originally came from China, where it was associated with Buddhism and represented radiating light or even the inner light of the soul. Before cotton became available to ordinary people, hemp was a very important source of cloth. There are many asanoha variations. It was particularly popular for children's clothes and bedding, and clothing for newborn babies would be decorated with the design in the hope that the child would grow up strong like the hemp plant. It also symbolized a wish for good health."

Left front: dark red simple 16 division covered with flax leaf
Right front: pattern from Color Coordinated Temari, page 18
I get so distracted while stitching a temari from a Japanese book and often change the design along the way or stitch only the part of the pattern that really interests me. But finally, I managed to finish one. The largest ball (right front) in the photo above is from the book Color Coordinated Temari, page 18. I'll be sharing details of how I made this one in our Temari Challenge Yahoo group.

There are still so many more flax leaf temari that I want to try. I'm not sure where I'll head next but I'll be sure to keep you posted.

Laura B. recently finished a beautiful temari with flax leaf design. Check it out on her blog...

Friday, July 20, 2012

Flax leaf stitching fun

Carolina posted some fun that she had stitching flax leaf design on temari over on her blog Rududu's semitropical adventures! She learned the technique on a C8 temari and then stitched some temari from a Japanese book and even designed her own. This is one of those techniques that works up so quickly and has a big impact. Once you start, it's hard to stop!

Carolina's flax leaf temari - WOW!

Sunday, June 24, 2012

Continuous motif - a temari stitching term

An excerpt from my new book Temari Techniques

Do you remember drawing stars in elementary school? You put your pencil on the paper, draw five straight lines along a path without lifting the pencil, and end right back where you started with a five-point star. You can stitch a star on temari in much the same way by taking a basic stitch at each turn your pencil would make. You are not limited to stars, though; there are many other continuous motifs which can be created in the same manner. These are different than shapes like squares and triangles because the thread path will cross over other stitches in the same motif as you stitch.


The Japanese have a phrase, hito hude gake (one stroke of the brush), to describe a kanji character that can be drawn with a single stroke of the calligraphy brush. Temari artists have borrowed this phrase to describe these continuous paths where one single stitching path will create the entire figure. Some motifs have special names because they are so common: hoshi kagari (five-point star) and mitsubane kikkou kagari (triwing).  After exploring the individual hito hude gake motifs, try the “one stroke” technique to complete multiple motifs with just one stitching path. Setting up the path is an intriguing temari puzzle; stitching along the path is a relaxing, almost meditative, experience.

Practice by drawing the path for your first continuous motif on paper to get a feel for how it is created. You could also place pins in your temari and wind perle cotton along the path to visualize the completed motif. Typically, diagrams will have the stitches numbered to help you get started. You can pin numbered slips of paper to the guidelines on the ball to help you stitch the first row.

Note: Renzoku means continuous in Japanese. All of these motifs are stitched with a single, continuous path. The term continuous motif (or hito hude gake) simply adds the requirement that one path is used to complete an outline of the entire motif. It has the same starting and ending points.


Monday, January 30, 2012

Herringbone stitch for temari

Add support lines to help
place stitches at the outside points.


Update - last night I stitched a new temari with this unusual technique of stitching a kiku herringbone at the inside points combined with a wide herringbone at the outside points of the circular motif. I really like the result!


Wednesday, June 1, 2011

Flower Temari Challenge - Forsythia

Forsythia stitched on a Japanese temari
 

Finally! Diagrams for forsythia! Time flies when you're having fun, right? Well, I've been having lots of fun for the past few months since I consider teaching temari fun :)   Now, it's time to catch up with a lot of other projects that have been on hold.


Divide each short line
into six sections.
So here I am, back to diagramming flowers. Forsythia has lots of tiny yellow flowers and is absolutely one of my favorites!

Guidelines - thin metallic. I used Treasure Braid Petite High Gloss Copper (PH13) by Rainbow Gallery to add the guidelines. I love this thread! It is strong yet fine and looks just like metal on the ball. Hint, hint - there are some 300 yard spools left in my shop if you hear it calling your name!

Yellow flowers - variegated yellow/orange. I used Caron Watercolors 275 Daffodil (separated to one strand). Filled with light yellow Caron Watercolors 131 Banana.

Brown twigs - light brown. I used the browner parts of variegated Caron Watercolors 189 Gingersnap (separated to one strand).

To make all the little flowers, I decided to subdivide the pentagon. The first step is to measure a short line, divide by 6, and place 5 pins along each line to divide each one into 6 sections. Then pretend like this is a multicenters temari and add guidelines until all of the pins are connected and you have a grid of tiny triangles all over this C10 pentagon. If you were dividing the entire temari like this, it would have 482 centers.

Stitch to connect pins and
create multicenters.
The next step is to find the smallest shape in the center - it's a pentagon. Stitch a tiny herringbone around that center with the stitches placed on the long lines, inside the pentagon. Place stitches on the short lines just outside the pentagon.  Then locate the five hexagons surrounding that tiny pentagon.

Stitch a tiny herringbone.

When stitching the hexagons, you will stitch inside the hexagon on each guideline. Place stitches outside the hexagon just over the flat side of the hexagon. There won't be a guideline there for you to use to place that stitch so just eyeball it and place it out over the side of the hexagon. Extend it past the side a couple of needlewidths so you'll have room to interlock it when you stitch in the hexagon next door. Interlock all shapes as you stitch by weaving under and over.


Using the same thread, fill in most of the hexagons with the exception of a few in each corner where you can place brown pine needle stitches to represent the twigs on the forsythia bush.


The last step is to stitch around each of the hexagon centers (one row) with light yellow to add a bit of fill for those flowers. I love the look of all these teenie flowers. Hope you do too!

Thursday, May 19, 2011

Easy interacting

I'm teaching a temari class online for experienced, intermediate stitchers and something came to mind when I was writing this week's lesson. It's a basic technique for temari - what do you do when two motifs intersect? We are stitching on a combination 10-division temari in class but these four techniques can be worked on any division. In fact, it's one of the first things temari makers learn.

It turns out these different ways to combine stitched shapes are very unique, each making for a brand new temari design. This is kind of exploration makes temari so fascinating and so much fun!

Tuesday, April 5, 2011

Part 2 - April Temari Challenge - 20 Faces to Fill

Quick post today. This is a follow up on the challenge 20 faces marking sampler going on in TemariChallenge Yahoo group

Here are a couple of photographs of the temari I stitched with this marking:

Variety of herringbone designs stitch on 20-faces temari

Wednesday, March 30, 2011

March Temari Challenge

I've talked about TemariChallenge Yahoo group often. Have you joined yet? I sure hope so. Joan led us through a pattern that she figured out from one of the temari books published in Japan. I just finished putting the final touches on mine....

March Challenge Temari

Wednesday, March 2, 2011

Split Kiku (2 colors, 4 needles)

In a diversion from the flower temari challenge, I'd like to share a new temari with the kiku (chrysanthemum) design stitched in 2 colors. I guess I needed a break from all those flowers!

If you need any help with temari terminology, please have a look at my website glossary and stitch directory. 

Kiku design temari stitched with two colors.

Thursday, February 17, 2011

Hydrangea - Flower Temari Challenge

Fluffy poofs of lavender, purple, blue, and pink hydrangeas are my daughter's favorite flowers and are at the top of my list for the Flower Temari Challenge.

Hydrangea
The first post on Flower Temari Challenge gives info on making and marking the ball. 

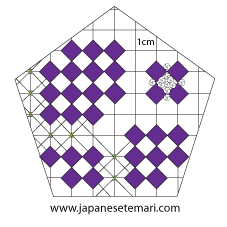
Lovely shades of variegated Caron Watercolors thread makes this flower fun to transfer to a stylized design on a temari.  Once again, I've irreverently disregarded the shape of the 10-part pentagon.  Since I wanted to represent each petal with a small square, I stitched a grid with copper colored metallic thread, laying the lines 1cm apart and at right angles. Here's the diagram:


After stitching the grid lines, I placed groups of pins where I would stitch the squares to form each flower head. Threads used for the squares (all are Caron Watercolors): #232 African Violet and #267 Wisteria.

With #124 Sunglow, stitch French knots in between the squares and a few around the edge of each flower head. 


Then add more grid lines, this time on the diagonals. You can stitch under the flowers. Secure each intersection of grid lines with a small cross stitch (#271 Wasabi).  I guess you could add these diagonal lines and the cross stitches before stitching the flowers.

I love the way the French knots raise the stitched design so it looks and feels very textural. The grid in the background offers a contrast with its fine, almost elegant look.  I just wish my camera could capture that feel.


Friday, February 11, 2011

Lantana - Flower Temari Challenge

Lantana
Lantana is one of my favorite plants for thriving in the hot summer here in North Carolina. When I saw Caron Watercolors #276 Tequila Sunrise, I knew right away it would suit these little flowers that vary in color from hot pink to red to orange and yellow. Use it for all the stitching in this pentagon.


The first post on Flower Temari Challenge gives info on making and marking the ball. 

1. Add support lines in fine metallic green thread. Divide each pentagon short line into 3 sections. Stitch concentric pentagons and then add the remaining support lines like a 122 centers marking.
2. With Caron Watercolors #276  Tequila Sunrise, stitch individual flax designs in the center pentagon and in 5 hexagons surrounding it.  Note that these hexagons line up point to point with the pentagon (not flat side to flat side).   Begin by stitching a pine needle design in each shape.

Then stitch a herringbone for the border of each little flower, taking stitches at the inside points under the pine needle stitches. Place stitches for the outside points just outside the shape. Interlock the outside points with those of other shapes where they cross. For the center pentagon, extend the outside points on the pentagon long lines.

3. With the same thread, stitch a spiderweb backstitch around the center of each flax design (3 rows).
That completes the lantana flowers. I will probably add some leaves or other touches to this design later on - after I've completed all the pentagons. Then I'll be able to see any empty spots that need to be filled with more stitching.

Happy stitching!

Friday, February 4, 2011

Chrysanthemum - Flower Temari Challenge

A traditional temari kiku (chrysanthemum) design fills this pentagon on the Flower Temari Challenge ball. The kiku herringbone stitch is used in a layered fashion with the stitches packed closely together to cover much of the thread-wrapped surface.

First post on Flower Temari Challenge gives info on making and marking the ball.

Begin by using a thin metallic thread to divide the pentagon into twenty sections. Place the stitches for the inside points very close to the center intersection. For the outside points, place stitches for the first row 1.5cm from the outside border (the triwing stitching).

Using Caron Watercolors # 057 Buttercup, stitch a layered kiku herringbone design, adding enough rows so you almost reach the triwing stitching. Leave enough room for two more rows. Stitch these with #206 Guacamole. (Don't you just love the names of the thread colors?!)


Fill the center with French knots using #057 Buttercup. Use one strand of thread in the needle and wrap three times for each knot.

Add a bit of sparkling green metallic between the kiku sections in the centers. 

Finished!


Thursday, February 3, 2011

Forget-me-nots - Flower Temari Challenge

In my last post Weaving Designs for Fill, I wrote about a hexagonal weave (mutsume ami). That's the one I used to fill a pentagon and create a grid for stitching little forget-me-not flowers. I always type forget-me-KNOT and then have to go back and correct! I guess that comes from writing so many patterns :)

First post on Flower Temari Challenge gives info on making and marking the ball. 

How to fit a hexagon-shaped woven pattern into a pentagon? Very carefully! Start by stitching a line with thin metallic thread like the blue line in this diagram - from the point of the pentagon to the middle of the opposite side. Add parallel lines that are equidistant. I spaced them 0.5cm apart. To align the remaining threads crossing through the pentagon, it really helps to use a paper template shaped like a hexagon (pink hexagon in the drawing below). Pin the paper hexagon to the ball and use the sides to align the first line in each direction.


All design threads are Caron Watercolors.

Stitch the flowers with #234 Celestial Blue. Bring thread up a 1 and make a long underground stitch from 2 to 3. Try not to disturb the grid lines by pulling them out of place with the underground stitch. Between stitches, always lay your thread above the needle (towards the outside of the design) so your stitches will all be the same and a neat circle is formed.


Continue stitching a hexagon shape by going down at 4, up at 5, etc.


With the same thread, stitch another row. This time make short underground stitches. Both rows will close in towards the center.

To fill in the center of the flower, use # 275 Daffodil. Use doubled thread and make a small straight stitch through the center. Leave it a little loose but neat.

Stitch more flowers over the grid leaving a few empty spaces which you can fill with pine needle stitches ( #271 Wasabi).

All done!


Monday, January 31, 2011

Weaving Designs for Fill

The TemariChallenge group "Flower Challenge" is still challenging me! I'm working on the third of 12 pentagons to be filled with some of my favorite flowers. I've chosen the cute, little forget-me-not flower for the next one. For the background, I've stitched a hexagonal weave and will place the blue and yellow flowers on top. What's a hexagonal weave? The topic for today's post - that's what it is.

Saturday, January 29, 2011

Sunflower - Flower Temari Challenge

Sunflower Temari

I can't count the number of sunflowers that I've stitched on temari - so many! This is the first one with a woven center. Usually, I fill the center by stitching a lot of French knots or by just stitching around the guidelines (around and around and around from the center outwards). This version is more stylized than the others with having so much open space for the petals. I did a lot of frogging (rip it, rip it) and restitching to experiment and am finally happy with the result. Since I might use this temari for my JTA Level 4 certification one day, I want to make each flower look new and different by combining some traditional temari stitches with some traditional Western surface embroidery stitches and other fiber techniques.  So far, so good.

First post on Flower Temari Challenge gives info on making and marking the ball. 

Unfortunately, I forgot to take pictures in progress! I have a really nice set up in my office/studio/sewing room. My desk is by a window so I can watch the birds and squirrels gorge themselves at the feeders outside. I have a computer on the desk and a light box with camera set up on a table just to my right. The table is actually and old interior door that sits on top of two filing cabinets. So I can sign on to Netflix, watch an instant download TV show or movie, stitch, snap photos, and make notes on my computer, all within easy reach. I'm in heaven!  When I stitched this sunflower, I was so wrapped up in watching Doc Watson on Netflix that I totally forgot about stopping to take pictures. Sorry about that! I know they are a big help. So I've done some extra drawings to replace those photos. I lived in Cornwall, England,  for a few years during my wild and impetuous youth so I love the scenery, the villages, and even the characters in Doc Watson. They remind me of some fun but challenging (dirt poor) times.

Back to the sunflower - here's the quick version of what I did. All thread is Caron Watercolors.

1. Woven center: pin a 1.75cm radius paper circle guide to the center of the 10-part pentagon. Outline the circle with inconspicuous thread (stem stitches). Remove paper circle.  With #164 Cinnabar, stitch parallel rows of single thread straight across to fill the circle (like a satin stitch shown on Sharon B's site).  Next, use the same thread to stitch and weave at right angles to the first stitching. Weave under 2 and over 2.

2. Layered pentagons: pin a 2.0cm radius paper circle guide to the center. Place pins at the edge of the paper circle next to all guidelines. Remove paper circle. Stitch 2 pentagons, layered, with #275 Daffodil (7 rows on each pentagon). Make sure the first pentagon rows cover the edges of the woven center.

3. Herringbone: first add extra guidelines. With copper metallic thread, stitch on top of the original 10-part pentagon guidelines, going under the woven area in the center.
First row herringbone: place guide pins for the outside points of the herringbone 1cm inwards from the end of each guideline (from the edge of the triwing stitching). The inside points of the herringbone begin in the woven center, near the edge. With #275 Daffodil, stitch one row herringbone on each set of guidelines to make a layered herringbone design.

 
 Second row (same thread): stitch 1 row  kiku herringbone, placing stitches at inside points under and around the previous row. Place stitches for the outside points very close to the triwings (leave room for one more stitch).


Third row (same thread): stitch around the outside of the flower, connecting the outside points.


That's it! A new sunflower.

Thursday, January 27, 2011

Queen Anne's Lace - Flower Temari Challenge

Queen Anne's Lace 


In our TemariChallenge Yahoo group, we have a challenge going to stitch a flower sampler with 12 different flowers. Each person picks their favorite flowers and shares pictures and tips on making it. This is definitely advanced stitching so if you are new to temari, please don't be blown away! You can stitch the same flower on a ball that isn't marked or you could mark a simple division and stitch a flower on the north pole and another on the south pole. This idea with the challenge is to work at your own level, learn from everyone else, and enjoy stitching flowers. I realize that we don't all speak the same temari "language" so if you have trouble understanding me, have a look at the glossary on my website. I hope that will help.

Here's the first one I've done - Queen Anne's Lace.  This has been one of my favorite flowers since I was a kid. It's also known as a wild carrot. Yes, you really can eat the root.

Step 1

Here's a quick overview of how I made this one. Wrap a 51cm circumference temari with MaxiLock Spruce thread. Mark in a combination 10-division with inconspicuous thread. All the stitching is done with Caron Watercolors separated so you use just one strand in the needle. With #206 Guacamole (yellowish green), stitch a solid hexagon in the center of each 6-part triangle (4 rows). Then stitch continuous triwings ( 2 rows #065 Emerald and 1 row #089 Caribbean). Now the ball has 12 pentagons ready for filling with flowers.

Step 2
Make paper templates for 3 flowers. One should be a full circle about 4cm diameter; one should be an oval about 3cm by 2 cm; one should be a half circle that is a 5cm full circle folded in half.   Fold each into 8 sections and mark the section lines with a pencil. Arrange the paper shapes in a pentagon. Place pins at the outer edges of the circles at the pencil lines.

Step 3
Remove the paper templates and use metallic green thread to stitch guidelines. For each flower, stitch a  herringbone with #206 Guacamole. Add lots of French knots (3 wraps for each) with #078 pearl.  Use #206 Guacamole to make the flower stem (stem stitch, of course!).

 I'm not sure which flower is next. I have lots of favorites. Maybe I'll go for a sunflower.