 |
| Such fun! Crazy quilting with Judith Baker Montano |

Showing posts with label embroidery. Show all posts
Showing posts with label embroidery. Show all posts
Tuesday, January 29, 2013
Thursday, September 6, 2012
Cast on stitching makes an adorable, dimensional flower
Week 32 in Sharon's TAST (Take a stitch Tuesday) was the cast on stitch. If you have ever started a knitting project, this stitch will be a snap for you to pick up. It makes an adorable flower!
 |
| Cast on stitch |
 |
| The flower stands up above the surface. |
 |
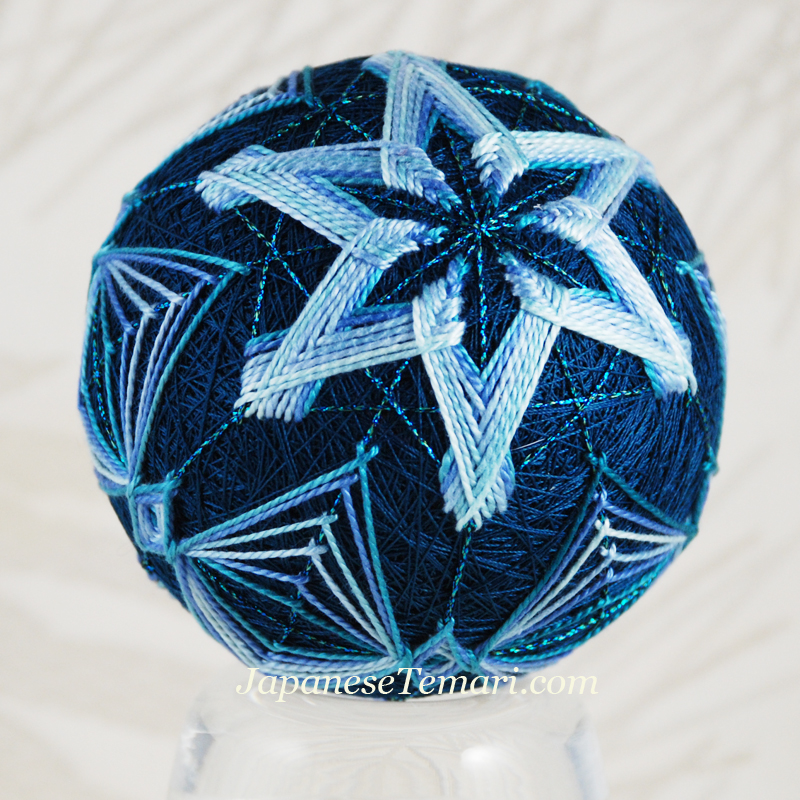
| Progress so far on a new temari design |
Wednesday, April 4, 2012
Catching up with TAST

Remember Take A Stitch Tuesday? Every week Sharon B. challenges her readers to try a new embroidery stitch or, if you already know the stitch, to go above and beyond with new experiments in stitching. The embroidery that people are sharing is so impressive and inspiring. I've been trying out embroidery on a large, sampler temari and using Caron Watercolors - really nice cotton that comes in variegated colors.

Week 14 - satin stitch I was inspired by Mary Corbet's tutorial on stitching dots - they are just too cute! I'd never done satin stitch on temari and, yes, found it a real challenge without access to the wrong side. You have to work everything as a sewing stitch (not stabbed) with temari. This method makes for a wonderful raised dot - so puffy.
Week 13 - time to take a break and have a week off -
Oh, yes! Thanks. I took the week to catch up.

Week 12 - barred and alternating chain stitch
Never done this, never even seen it. This spiky looking version of the adorable chain stitch is not all that hard using Sharon's good photos. I really had to keep my mind on the stitching to get it to turn out right. The inner ring here is barred, with all the long stitches out to one side. The line stitched around the triangle is alternating barred chain stitch. I had seen some of other people's samples and really like the look of stitching barred after barred, in a line, without the regular chain stitch in between.

Week 11 - whipped wheel
Sharon mentions that another name for this stitch is spiderweb backstitch. That's what I've known it as and have done lots of these. Another "TASTer" has a tutorial posted where she combined weaving with whipped version, so I had a go at that. Mine is much messier - I'd blame it on stitching on a ball but that's probably not true!
Week 10 - running stitch
After practicing the running stitch in a small triangle on the ball, I tried it here making circles around the whipped and woven wheel. Not my favorite. But this is all about experimenting, right?
Friday, February 3, 2012
Sweet Home by Posie

Monday, January 30, 2012
Herringbone stitch for temari
 |
| Add support lines to help place stitches at the outside points. |
Update - last night I stitched a new temari with this unusual technique of stitching a kiku herringbone at the inside points combined with a wide herringbone at the outside points of the circular motif. I really like the result!
Feather and Cretan stitches for temari

Week 3 TAST (take a stitch Tuesday with Sharon) is the feather stitch.
I used it to fill a triangle.
Sunday, January 29, 2012
Buttonhole stitch on temari for TAST

Friday, January 27, 2012
Fly Stitch on Temari for Take a Stitch Tuesday

Wednesday, June 1, 2011
Flower Temari Challenge - Forsythia
 |
| Forsythia stitched on a Japanese temari |

Finally! Diagrams for forsythia! Time flies when you're having fun, right? Well, I've been having lots of fun for the past few months since I consider teaching temari fun :) Now, it's time to catch up with a lot of other projects that have been on hold.
 |
| Divide each short line into six sections. |
Guidelines - thin metallic. I used Treasure Braid Petite High Gloss Copper (PH13) by Rainbow Gallery to add the guidelines. I love this thread! It is strong yet fine and looks just like metal on the ball. Hint, hint - there are some 300 yard spools left in my shop if you hear it calling your name!
Yellow flowers - variegated yellow/orange. I used Caron Watercolors 275 Daffodil (separated to one strand). Filled with light yellow Caron Watercolors 131 Banana.
Brown twigs - light brown. I used the browner parts of variegated Caron Watercolors 189 Gingersnap (separated to one strand).
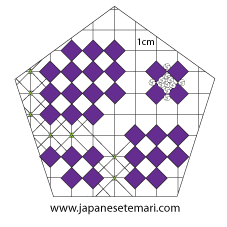
To make all the little flowers, I decided to subdivide the pentagon. The first step is to measure a short line, divide by 6, and place 5 pins along each line to divide each one into 6 sections. Then pretend like this is a multicenters temari and add guidelines until all of the pins are connected and you have a grid of tiny triangles all over this C10 pentagon. If you were dividing the entire temari like this, it would have 482 centers.
 |
| Stitch to connect pins and create multicenters. |
 |
| Stitch a tiny herringbone. |
When stitching the hexagons, you will stitch inside the hexagon on each guideline. Place stitches outside the hexagon just over the flat side of the hexagon. There won't be a guideline there for you to use to place that stitch so just eyeball it and place it out over the side of the hexagon. Extend it past the side a couple of needlewidths so you'll have room to interlock it when you stitch in the hexagon next door. Interlock all shapes as you stitch by weaving under and over.

Using the same thread, fill in most of the hexagons with the exception of a few in each corner where you can place brown pine needle stitches to represent the twigs on the forsythia bush.

The last step is to stitch around each of the hexagon centers (one row) with light yellow to add a bit of fill for those flowers. I love the look of all these teenie flowers. Hope you do too!
Saturday, April 23, 2011
How to stitch on a thread-wrapped temari
It seems like forever ago that I wrote a bit here about how to make a temari ball.
Spring has arrived here in North Carolina and I thought I'd share how to stitch happy little flowers on a temari. No adding guidelines or anything. Just use your embroidery skills, some pearl cotton, and bring these bright colors into your crafting. The daisies are made by stitching detached chain stitches or lazy daisy stitches grouped together in a little circle. Then you fill the center with yellow French knots. You'll need to use a sewing method rather than a stabbing method since you don't have access to the wrong side of the work like in regular embroidery on fabric. A couple of tips for you ...
 |
| Wrap your temari with blue thread. Stitch happy, sloppy daisies with pearl cotton. |
Tuesday, February 22, 2011
Poinsettia - Flower Temari Challenge
Here's another face done for our temari challenge. This one started with the name red daisy but I switched it to poinsettia whenI discovered that I don't really need any more summer flowers for this temari. I do need one for December, though. We are stitching on a combination 10-division temari that has twelve faces (pentagons) to be filled with flowers. The goal is to select one for each month of the year.
First post on Flower Temari Challenge gives info on making and marking the ball.


2. Mark the spots for the stitches taken for the top of each kite shape (the points closest to the center). Measure out from the center 1.5cm and place a pin on each of the ten division lines. Actually, I like to print out a circle guide for this step and just pin it to the center.
3. Mark the spots for the stitches taken for the bottom of each kite shape (those towards the outside of the shape). Place pins 1.5cm from the outer edge (the triwing stitching).
4. With #078 Pearl, stitch 1 row on each kite - layer the sides of the kites over each other as you work your way around the ball until all 10 kites have one row done.
5. Continue adding rows to each kite, one at a time to make a layered design. Add a total of 5 rows #084 African Sunset on each kite or until the edges touch.
6. With #209 Iris, stitch a herringbone around the outside edge of the kites. Then add spokes across the center, one for each division line. Stitch a spiderweb backstitch around the center.
I've got to get busy stitching more flowers - only a few more to go! Are you a member of TemariChallenge Yahoo group? If not, please join us. Other members are adding their flowers and the folder of flower photos is beginning to bulge!
First post on Flower Temari Challenge gives info on making and marking the ball.

This one is probably hard to figure out without seeing the diagram. Do you see the kite shapes? I've colored one red and one blue. Since this is a 10 division, there are 10 kite shapes layered around the center intersection. I added 1 row on each at a time until the spaces between them were filled. All threads are Caron Watercolors.

1. Stitch support lines: place a pin 2cm out from the center on each of the 10 division lines. Stitch at the pins making a 10-sided shape (dashed line in the diagram). You will use these support lines when stitching the sides of the kite shapes.
I've got to get busy stitching more flowers - only a few more to go! Are you a member of TemariChallenge Yahoo group? If not, please join us. Other members are adding their flowers and the folder of flower photos is beginning to bulge!
I woke up today to news of the horrible earthquake in Christchurch, New Zealand, and my heart is so sad - I could not watch without tears coming to my eyes. Our family spent two wonderful, amazing weeks traveling around this beautiful country. There's no place like it on earth. Let's keep them in our prayers and offer any support we can.
Thursday, February 17, 2011
Hydrangea - Flower Temari Challenge
Fluffy poofs of lavender, purple, blue, and pink hydrangeas are my daughter's favorite flowers and are at the top of my list for the Flower Temari Challenge.
The first post on Flower Temari Challenge gives info on making and marking the ball.
Lovely shades of variegated Caron Watercolors thread makes this flower fun to transfer to a stylized design on a temari. Once again, I've irreverently disregarded the shape of the 10-part pentagon. Since I wanted to represent each petal with a small square, I stitched a grid with copper colored metallic thread, laying the lines 1cm apart and at right angles. Here's the diagram:

Then add more grid lines, this time on the diagonals. You can stitch under the flowers. Secure each intersection of grid lines with a small cross stitch (#271 Wasabi). I guess you could add these diagonal lines and the cross stitches before stitching the flowers.

 |
| Hydrangea |
Lovely shades of variegated Caron Watercolors thread makes this flower fun to transfer to a stylized design on a temari. Once again, I've irreverently disregarded the shape of the 10-part pentagon. Since I wanted to represent each petal with a small square, I stitched a grid with copper colored metallic thread, laying the lines 1cm apart and at right angles. Here's the diagram:
After stitching the grid lines, I placed groups of pins where I would stitch the squares to form each flower head. Threads used for the squares (all are Caron Watercolors): #232 African Violet and #267 Wisteria.
With #124 Sunglow, stitch French knots in between the squares and a few around the edge of each flower head.

Then add more grid lines, this time on the diagonals. You can stitch under the flowers. Secure each intersection of grid lines with a small cross stitch (#271 Wasabi). I guess you could add these diagonal lines and the cross stitches before stitching the flowers.

I love the way the French knots raise the stitched design so it looks and feels very textural. The grid in the background offers a contrast with its fine, almost elegant look. I just wish my camera could capture that feel.
Friday, February 4, 2011
Chrysanthemum - Flower Temari Challenge
A traditional temari kiku (chrysanthemum) design fills this pentagon on the Flower Temari Challenge ball. The kiku herringbone stitch is used in a layered fashion with the stitches packed closely together to cover much of the thread-wrapped surface.
First post on Flower Temari Challenge gives info on making and marking the ball.
Begin by using a thin metallic thread to divide the pentagon into twenty sections. Place the stitches for the inside points very close to the center intersection. For the outside points, place stitches for the first row 1.5cm from the outside border (the triwing stitching).
Using Caron Watercolors # 057 Buttercup, stitch a layered kiku herringbone design, adding enough rows so you almost reach the triwing stitching. Leave enough room for two more rows. Stitch these with #206 Guacamole. (Don't you just love the names of the thread colors?!)

Fill the center with French knots using #057 Buttercup. Use one strand of thread in the needle and wrap three times for each knot.
Add a bit of sparkling green metallic between the kiku sections in the centers.
Finished!

First post on Flower Temari Challenge gives info on making and marking the ball.
Begin by using a thin metallic thread to divide the pentagon into twenty sections. Place the stitches for the inside points very close to the center intersection. For the outside points, place stitches for the first row 1.5cm from the outside border (the triwing stitching).
Using Caron Watercolors # 057 Buttercup, stitch a layered kiku herringbone design, adding enough rows so you almost reach the triwing stitching. Leave enough room for two more rows. Stitch these with #206 Guacamole. (Don't you just love the names of the thread colors?!)
Fill the center with French knots using #057 Buttercup. Use one strand of thread in the needle and wrap three times for each knot.
Add a bit of sparkling green metallic between the kiku sections in the centers.
Finished!

Thursday, February 3, 2011
Forget-me-nots - Flower Temari Challenge
In my last post Weaving Designs for Fill, I wrote about a hexagonal weave (mutsume ami). That's the one I used to fill a pentagon and create a grid for stitching little forget-me-not flowers. I always type forget-me-KNOT and then have to go back and correct! I guess that comes from writing so many patterns :)
First post on Flower Temari Challenge gives info on making and marking the ball.
How to fit a hexagon-shaped woven pattern into a pentagon? Very carefully! Start by stitching a line with thin metallic thread like the blue line in this diagram - from the point of the pentagon to the middle of the opposite side. Add parallel lines that are equidistant. I spaced them 0.5cm apart. To align the remaining threads crossing through the pentagon, it really helps to use a paper template shaped like a hexagon (pink hexagon in the drawing below). Pin the paper hexagon to the ball and use the sides to align the first line in each direction.

All design threads are Caron Watercolors.
Stitch the flowers with #234 Celestial Blue. Bring thread up a 1 and make a long underground stitch from 2 to 3. Try not to disturb the grid lines by pulling them out of place with the underground stitch. Between stitches, always lay your thread above the needle (towards the outside of the design) so your stitches will all be the same and a neat circle is formed.

Continue stitching a hexagon shape by going down at 4, up at 5, etc.

With the same thread, stitch another row. This time make short underground stitches. Both rows will close in towards the center.

To fill in the center of the flower, use # 275 Daffodil. Use doubled thread and make a small straight stitch through the center. Leave it a little loose but neat.
Stitch more flowers over the grid leaving a few empty spaces which you can fill with pine needle stitches ( #271 Wasabi).
All done!
First post on Flower Temari Challenge gives info on making and marking the ball.
How to fit a hexagon-shaped woven pattern into a pentagon? Very carefully! Start by stitching a line with thin metallic thread like the blue line in this diagram - from the point of the pentagon to the middle of the opposite side. Add parallel lines that are equidistant. I spaced them 0.5cm apart. To align the remaining threads crossing through the pentagon, it really helps to use a paper template shaped like a hexagon (pink hexagon in the drawing below). Pin the paper hexagon to the ball and use the sides to align the first line in each direction.
All design threads are Caron Watercolors.
Stitch the flowers with #234 Celestial Blue. Bring thread up a 1 and make a long underground stitch from 2 to 3. Try not to disturb the grid lines by pulling them out of place with the underground stitch. Between stitches, always lay your thread above the needle (towards the outside of the design) so your stitches will all be the same and a neat circle is formed.
Continue stitching a hexagon shape by going down at 4, up at 5, etc.
With the same thread, stitch another row. This time make short underground stitches. Both rows will close in towards the center.
To fill in the center of the flower, use # 275 Daffodil. Use doubled thread and make a small straight stitch through the center. Leave it a little loose but neat.
Stitch more flowers over the grid leaving a few empty spaces which you can fill with pine needle stitches ( #271 Wasabi).
All done!

Thursday, January 27, 2011
Queen Anne's Lace - Flower Temari Challenge
 | ||||||
| Queen Anne's Lace |
In our TemariChallenge Yahoo group, we have a challenge going to stitch a flower sampler with 12 different flowers. Each person picks their favorite flowers and shares pictures and tips on making it. This is definitely advanced stitching so if you are new to temari, please don't be blown away! You can stitch the same flower on a ball that isn't marked or you could mark a simple division and stitch a flower on the north pole and another on the south pole. This idea with the challenge is to work at your own level, learn from everyone else, and enjoy stitching flowers. I realize that we don't all speak the same temari "language" so if you have trouble understanding me, have a look at the glossary on my website. I hope that will help.
Here's the first one I've done - Queen Anne's Lace. This has been one of my favorite flowers since I was a kid. It's also known as a wild carrot. Yes, you really can eat the root.
 | ||
| Step 1 |
 |
| Step 2 |
 | |
| Step 3 |

Subscribe to:
Posts (Atom)
